We always recommend using a professional delivery service to send your marketing email and get the bounces correctly managed. We cannot grant this addon to be able to detect all kinds of bounces.
What's inside
- How bounces are reported
- Use a dedicated mailbox!
- How to configure this addon
- When it runs
- With Gmail
- Hard (permanent) and soft (transient) bounces
- Test the configuration and errors
How bounces are reported
When a message is sent to an invalid or unreachable address, most of the time you’ll receive a delivery error message as a response (it can take from a few seconds to some hours or even days).
Those notifications are sent to the “return path” address you can configure on the Newsletter plugin’s main settings.
If correctly formatted, those error notification messages contain a set of data, called DSN (delivery status notification) with information about the kind of error (temporary, permanent, and so on).
More about bounces can be read here.
The Bounce addon tries to analyze those messages and set the corresponding email addresses as “bounced” so they won’t be contacted again.
Use a dedicated mailbox!
You need to set up a new and dedicated mailbox to collect delivery error messages: all messages found will be processed and then deleted. Do not use your mailbox!
This addon does not work with GMail since Google does not allow the POP3 protocol.
If you use Post SMTP it removes the return path set by Newsletter, there are no known workarounds.
How to configure this addon
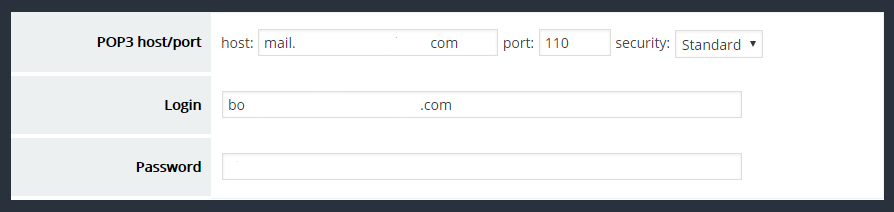
The Bounce addon needs a dedicated mailbox (email address) where all the error messages are collected. The mailbox has to be accessible using the POP3 protocol.
To instruct externals to send error messages in the right mailbox, you need to configure the “return path” on the Newsletter main settings.
Hourly, the Bounce addon reads all the messages, analyses them, and tries to detect if there are permanent errors reported; it extracts the bounced address, if present, and deletes the message. By the end of the process all the messages will be deleted!
The POP3 configuration needs a username, password, hostname, and port (optional). Those parameters can be found in your provider’s instructions on generic mail client configuration instructions.
If the mailbox can be accessed in secure mode (TLS, SSL), you can select the security protocol to use but remember to set even the port (usually it differs from the standard 110 port number).
When it runs
The extension checks the mailbox every hour and processes up to 1000 messages (but this could change). For your convenience the last time the extension checked the mailbox and the next run are reported in the configuration panel.

Please note: if your blog has some resource-intensive background processes (for example you’re sending a newsletter to a big list) the bounce checks could be delayed or sometimes skipped.
With Gmail
If you use Gmail as a mailbox for your error delivery messages, the POP3 must be explicitly enabled since it’s not active by default. You can read more here.
Hard (permanent) and soft (transient) bounces
Reported errors can be “permanent” or “transient”. The first type means the email address cannot be contacted (for example it is not existing). The second type is a temporary problem, for example, a full mailbox, and could be solved in the future.
Usually, only permanent errors are processed and the related email is marked as bounced, while transient errors are ignored. You can anyway configure the addon to process and consider bounced addresses even the ones for which a transient error is reported.
Technically, permanent errors have a code with the format 5.X.X while transient errors have a code with format 4.X.X.
Even if the error code should help in classifying it in detail using the last two numbers (X.X), many email servers do not set them correctly, so the addon does not process the sub-error codes.
Test the configuration and errors
Once you configured it, you can test if the extension can connect to the POP3 server.
If the connection was fine, you have a success message with some debug info on top of the page.
The test extracts 10 messages, and analyzes them but is a “dry run”, the extracted emails are not processed nor the messages deleted. To check if messages are correctly retrieved try to send an email to your bounce-dedicated mailbox.
No messages are captured by the dedicated mailbox
If no delivery error messages are captured and you’re sure there should be some, check if the return path is correctly configured on the Newsletter plugin main settings: it must be the address of the dedicated mailbox.
The return path could be changed or removed by your delivery system: the hosting provider if you send directly with WordPress, the SMTP service if you connected the blog to an SMPT using a plugin, or the delivery service if you’re using an external mailing service.
Delivery services usually change the return path to their address since they need to capture the error messages to report the delivery failures on their console. Sometimes they allow the forwarding of delivery error messages to your original return path or a specific email address but, usually, you won’t get back the error notifications.
To test if the error messages are delivered to your mailbox, deactivate the Bounce addon and, after sending one or more campaigns, check with an email client if the mailbox has collected some notifications. If the mailbox is empty or there are messages not related to delivery error notifications the Bounce addon cannot manage the bounces and you should discover why the notifications are not reported.
If you got an error message
If you get connection timeout errors or generally an error message without more specific information, there are a few options:
- the parameters you are using are not correct (for example the hostname, the password, the port, or protocol): double-check them with your provider; the most common error is to use the incorrect host or the username which does not always match the email address
- If your provider has a firewall rule blocking the connection, ask them via their support tickets or try different combinations of protocols and ports
Possible errors
- If you can read in the error text “
getaddrinfo failed” it means your server is not able to resolve the host you provided. Double-check it and if correct ask the provider to check the server to grant it can resolve the pop3 host. - If you see the text “
POP 3 connect: Error [0] []” this means there is a problem with PHP trying to set up the connection to your POP3. It’s not an error with the POP3 but even before connecting with it. The PHP documentation says: “This is most likely due to a problem initializing the socket”. You should ask your hosting provider to check if PHP is limited when using thefsockopen()function, specially if you set the POP3 connection with SSL or TLS.
Bounce checking timing
The extension reports the last time it checked for bounces and the next scheduled check. If you not it is not running at the correct time, you have a problem with your WordPress scheduler. Check on top of the page for an error message and take the time to read this page about the WordPress scheduler.
Why is important to manage bounces
Trying to send messages to an invalid address, again and again, is considered spammy behavior and could be a reason to list your domain or your server on a blacklist. Detecting bounces lets you quickly react to invalid addresses and stop sending them more messages.